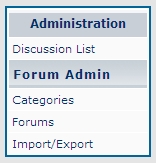
Organization
The JForum Discussion & Private Messages tool allows you to communicate asynchronously with your site participants and privately through the built-in private messaging component (to be covered later in this module).
There are four parts to the organizational structure of the discussion tool:
- Categories (Main and Other in image below)
- Forums (Questions, Class Discussions and Student Lounge in image below)
Categories include forums that fall under similar themes. For instance, an instructor could have a category called Group Work. Within the Group Work category, there might be forums titled Group A, Group B, and Group C. And within each of these forums there would be topics for each group and replies to those topics.
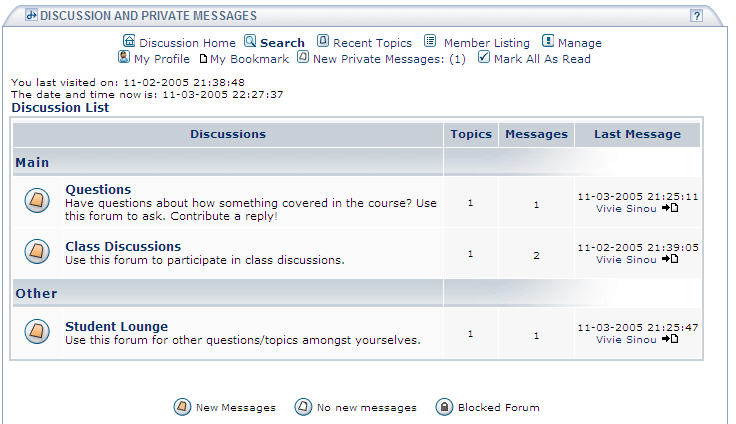
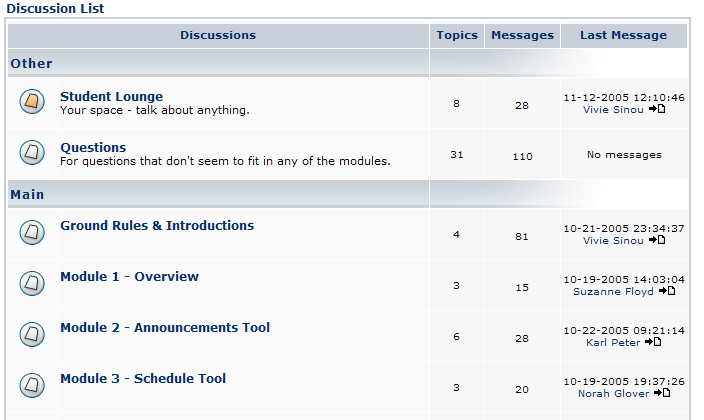
By default, you will have two categories in your site's discussion tool: main and other. The "Main"
category contains two forums, Questions & Class Discussions, and the "Other" category consists of one forum, the Student Lounge. There is nothing special about these default categories and forum names. You can change them to fit your unique needs.

There will be no pre-existing topics in your forums when you get a new course or project site. You will be able to export your categories and forums and import them into a new site. Additionally, topics that you have flagged as 'I'll re-use' will be exported/imported into new sites (without replies). This is covered in more detail later.
Back to top
Navigation
The home page for the Jforum Discussion & Private Messages Tool is considered the "Discussion Home" area. As you navigate through your forums and topics, you can return to home from any page of the tool by click on "Discussion Home" or "Discussion List."

As you click on forums, the software will build a navigation menu (breadcrumbs as shown in the image below), showing you the path you've taken. For instance, if you click on the Class Discussions Forum, the breadcrumbs show you where you are. The title of the forum you are at is displayed as well.

The menu bar and Discussion List navigation menu is accessible from all screens.No matter where you click (Recent Topics, Member Listing, Private Messages, etc.), you can return to the list of forums by clicking on Discussion List or Discussion Home.
You may also navigate in between forums by using the drop-down menu at the bottom of the Discussion forum pages. This is especially useful if you have finished reading a topic and its messages and you are at the bottom of the screen. It saves you time from scrolling back up to the top menu.
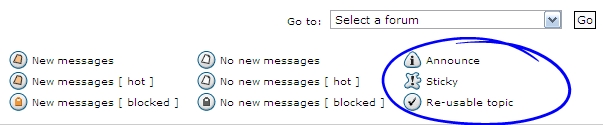
Finally, take a moment to study the legend above explaining the different types of icons used to highlight functionality, such as new, blocked messages, etc. Hot messages refers to messages that have had heavy dialogue and have reached to maximum number of replies to be considered hot (default is 30).
Student posts are always "normal" posts. Special types of postings can only be created by instructors. They include Announce, Sticky and Reusable topics and will be described in more detail in a later section.
Back to top
Student View
When participants first visit the site's discussion tool, they will see the Discussion List.
An observation that your students will make immediately is that the discussion tool is very similar to that of other message boards they may have used. And it's true: If your students have used other bulletin boards in the past, the JForum Discussion & Private Messages environment will be very familiar to them.
If you didn't change the default forums, when students (site participants) visit the discussion tool, they will see:
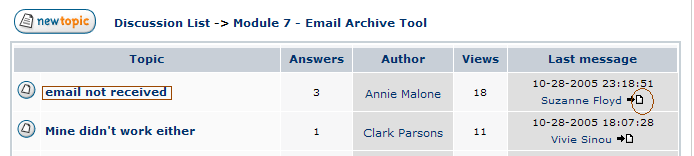
Instructors (facilitators) can add new forums to the existing list, or remove the default forums and create new ones for their discussions, as in the following example. Note that members can see at a glance where new activity is (orange folder), how many topics and messages (replies) are in a forum, as well as who posted the last message and when. Clicking on a user's name will bring up their profile; clicking on the letter icon will take the user to the actual message.
Students' first instinct will be to jump right in and start participating, and, by default, they can do just that. The default forums are public , meaning that anyone who is a "Participant" (access) or "Facilitator" (maintain) can read and respond to messages.
Back to top
Private Message
The discussion tool comes with integrated private messaging functionality.
Members have the ability to send private messages (PM) to any active site participant and facilitator(s).
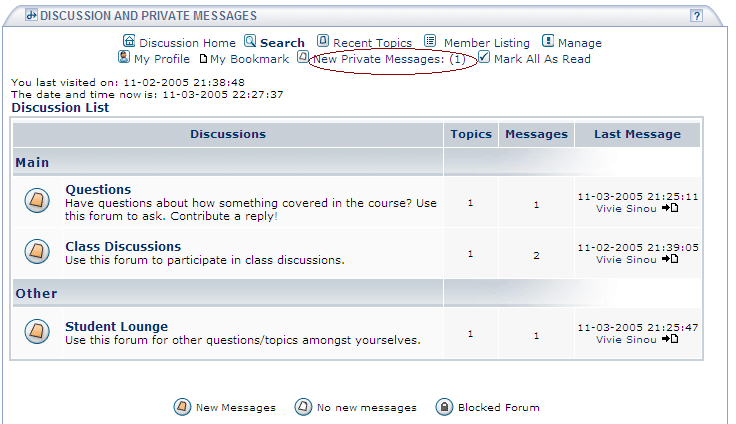
Upon entering the discussion tool, users can see immediately if they have any new messages. The number of unread, new messages is shown in parenthesis at the top menu bar. See image for an example.
The Private Messages area comes with an Inbox and a Send Box. The Inbox includes all the messages that came in from other users, and the Send box saves copies of the Private Messages that you sent to others.
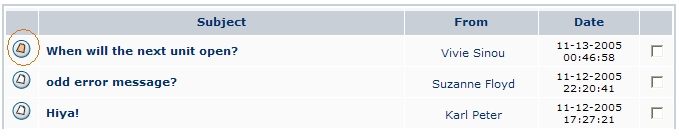
Upon clicking on Private Messages, any message that is unread is highlighted in orange.
If you are in the Inbox within Private Messages and want to send a message to a user, click on New PM and find user.
Other features include the ability to:
- Delete private messages. Simply check the boxes of the messages you want to delete and click on "delete."
- Post a reply to a private message. Click on Post Reply
- Reply with quote to a private message. Click on the Quote icon once you open the message.
If your preferences are set to "yes" in your profile for getting notified via email when new private messages sent to you, you will get an email notification at the email address associated with your Etudes account in the site. The email notification includes the box of the message, as well as the name of the sender. To reply to the PM, you must log into your Etudes site.
Sending a Private Message
You will want to send private messages if you want to share aside or off-topic notes with others, or to communicate information that would not be appropriate to post publicly.
There are at least three ways to identify who you want to send a private message to:
1) Using the Member Listing link at the menu bar:
- Click on Member Listing.
- Scroll down and find the user that you want to send a private message to.
- Click on the PM icon next to the user's name.
- Type a subject and message and post.
2) Using the Private Messages link on the menu bar:
- Click on Private Messages.
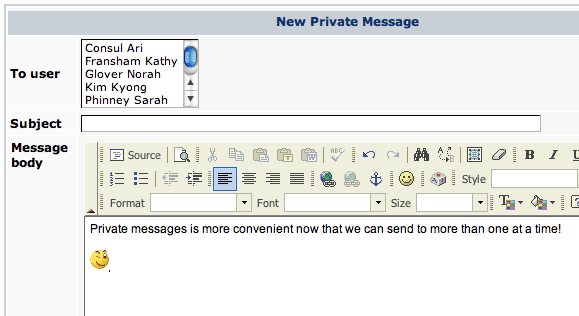
- Click on New Topic.
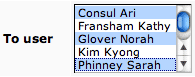
- In the To User area, click on the person you want to send the private message to. By default, you can send a private message to up to 10 members at a time. If you want to send the message to more than one person, highlight more than one name:
- If the names are next to each other, just click on the first and drag to the next
- If names are separated, click on one, then hold the Control (PC) or Command (Mac) key and click on the others
- If you highlighted someone you don't want, hold the Control (PC) or Command (Mac) key and click again - it's like an on/off switch
- Type a subject and message and post
Here is what it looks like with several participants chosen to send PM to:
3) While you're reading a discussion message from someone, you can click the PM button under their post. Type a subject and a message and click on post. That will set it up to send them a private message..
The New Private Message window looks like this:
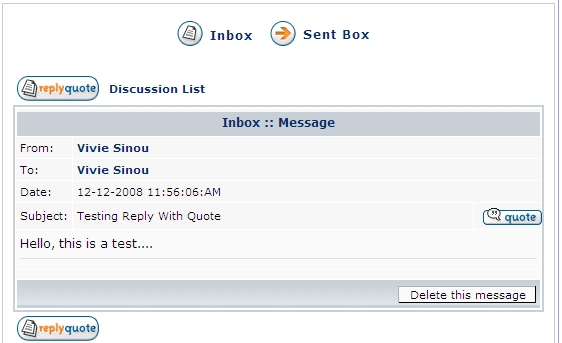
Replying to Private Messages
Reply with quote is the only option when replying to sent PM messages. You can select all and delete the previous communication if you don't want it, but it is beneficial to leave it at the bottom for reference to your sender.
This feature enhancement was implemented at the request of instructors, as too many students would forget to quote the original message, making it impossible to follow their inquiry without the content of the original message.
Add Attachments
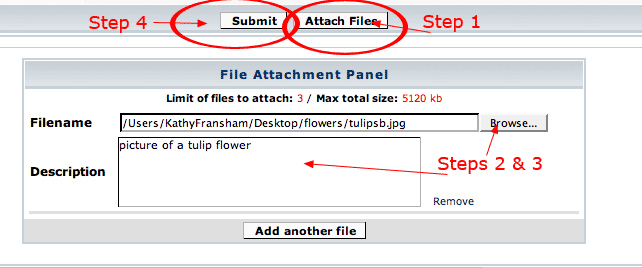
You can easily add attachments to a private message. Here is the procedure, using an image as the attachment.
- After typing the text portion of the PM into the editor box, click on the Attach Files button at the bottom of the window. (Note, a message must have some text in the window as well as the attachment, even if it's a simple, "Here is my file.")
- Next, locate the file on your local computer that you want to attach. Notice there is a 3-item limit. It's a very good idea to put a description in the box to make your message accessible.
- Click on the Submit after attaching the files you wish, remembering that 3's the limit.
One thing to be aware of when adding attachments to PMs: only images and media files appear embedded (inline) the posting. Other attachment types will come in as something users can download onto their own computers before opening.
Delete Private Messages
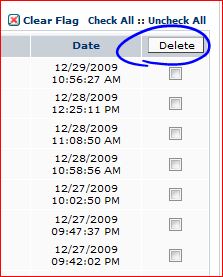
A "Delete" button is available at the top and bottom of the private messages list for your convenience. A "Delete" button is also available inside a message, after you open it. You can check one or more messages, or "check all," and click on Delete to delete them permanently.
NOTE: It is probably not a good idea to delete Private Messages from your class communication. You never know when you may need them for evidence in potential disputes. The "Delete" feature, however, can help you clean up trivial PM communication from your list.
Allowable Extension Types
This is a list of file types that can be added as attachments to your PMs. Your files must include one of these suffixes to upload as an attachment.
| Image/Photo |
Media |
Document |
Utilities |
.bmp |
.midi |
.doc, .docx, xls, etc. |
,gz |
.jpg / .jpeg |
.mov |
.pdf |
.tar |
.gif |
.wav |
.xls |
.zip |
.png |
.mp3 |
.ppt |
.sit / .sitx |
.psd |
.aac |
.pps |
|
.tiff |
|
.htm / .html |
|
.swf |
|
|
|
File types which are NOT allowed include: .exe, .bat, .pif, .bin.
You can attach up to 3 attachments maximum per PM. The default file size limit is 5MB per post.
If there are any extension file types that are critical, but not included in the allowable list, let us know.
Notes:
- You cannot post a message with attachments but no text in the window. You must put a text message into the box. Something as simple as "Attached is my project" will work.
- If you attach an image, make sure it is no larger than 600 pixels wide. Otherwise it will be too large for the window.
Back to top
Reading Topics
As mentioned earlier, users can see at a glance where new activity is (orange icon), how many topics and messages (replies) are in a forum, as well as who posted the last message and when. You can see where recent topics have been posted by the color of the forum folders. If there is new activity in a forum since your last visit, its icon will be highlighted in orange. Upon clicking on the forum, new topics or topics that have new replies will also have orange-highlighted icons.
As you can see in the image below, you can now mark topics as read from the list of postings in a forum. This is discussed below.
You can read a topic by clicking on the title of the Topic or by clicking on the page icon by the last poster's name.
Note: Clicking on a user's name next to their post will bring up their profile.
Reading Recent Topics from all Forums
The most efficient way to view and read new topics in any of the discussion forums is by clicking on Recent Topics. You will see a list with topics that have been posted in chronological order, with the most recent first. Topics that are new since your last visit will be highlighted in orange.
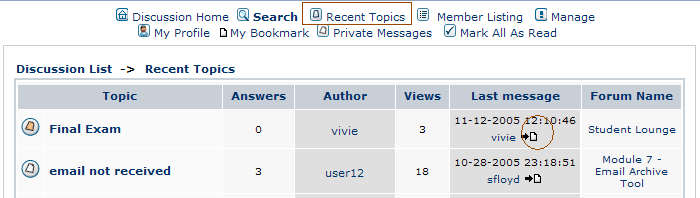
- Click on the title of topic to read it and all the replies below it.
- After completing that topic, click on Recent Topics again to return to the list and proceed to the next unread topic.
- When done reading and replying to ALL the new topics, as needed, click on Mark All As Read (see menu bar).
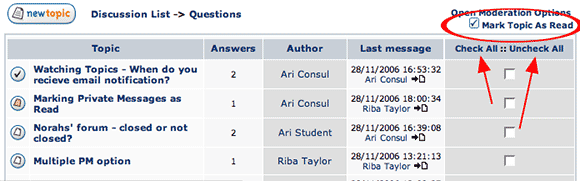
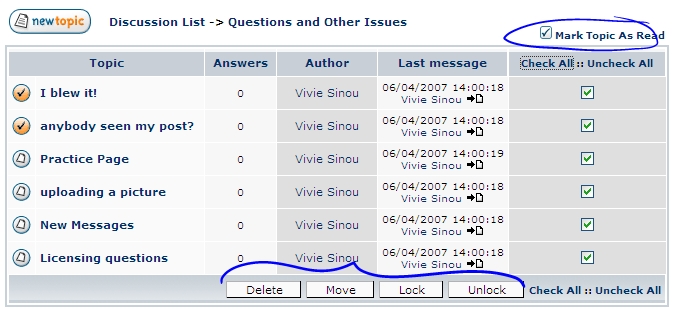
Marking Read Topics
When you read a topic, the icon changes from orange to white, to indicate that you've read it. If someone later posts to that topic, the icon turns orange again, indicating that there is something you haven't read yet. This works well so long as you remain in your discussion tool (single browser session). However, as soon as you leave your site (log out, go to another class, etc., and log back in) all those white icons turn orange again. You need to get into the habit of marking posts as read, so that the system knows you've truly read them. There are several ways to do so:
In the LIST of TOPICS, on the right side there is a column of check boxes.
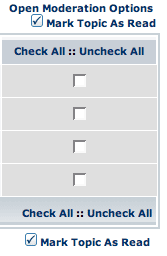
Click in the boxes you want to mark as read, then click on Mark Topic As Read, either at the top or the bottom of the list.
You can easily choose all boxes (or none) by clicking on Check All::Uncheck All. |
WHILE you're reading a topic, you can click on Mark Topic As Read, which is located both above and below the topic list.
Notice that new postings have a pinkish background until they've been marked as read. Once they are marked, they become white.
This makes it easy to see at a glance which postings are new when you enter the topic list.
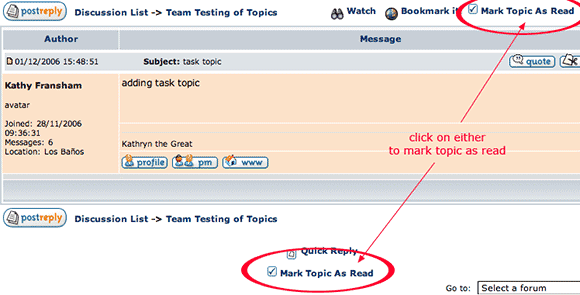
If you've read ALL the new posts but didn't yet mark them, you can click on Mark All As Read, located at the top of your page. This affects EVERY posting in every category, so just be sure that's what you want.

Back to top
Posting a New Topic
Students can initiate conversations (unless you have made a forum "Read Only" or "Reply Only"). They can post new topics as well as reply to existing topics.
Create a New Topic
- Click on the forum where you want to post a topic.
- Click on the New Topic button (available at the top and bottom of the forum screen)

SUBJECT: Try to type a very short, but descriptive subject line.
EDITOR: The FCK editor is the same as the one used for many other tools such as in Resources, Schedule, etc.
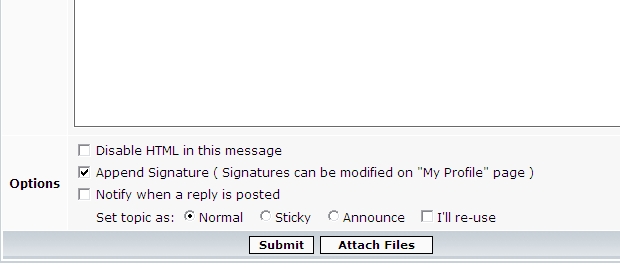
MESSAGE: Place the body of the message in the text area. If you wish to view in html format, click on the Source icon at the top left toolbar.
SET TOPIC AS: This refers to the nature of your topic. The default is set to normal. Students (participants) can only post "normal" topics. Facilitators can also post "sticky" (anchored) and "announcement" and "reusable" topics:
Announcement: most important - appears at the very top of the topic list. If more than one, appears in chronological order (newest on top).
Sticky: important - appears under announcements, but above tasks and normal posts.
Normal: all student posts are normal. They appear in chronological order under one of the other topic types.
I'll Re-use: Reusable topics are listed below announcement and sticky topics, but above normal topics. Reusable topics are those that you want to be copied with "Import from site" when you port your content over from term to term and with IMS Import / Export. Be sure to check topics you will re-use!
(Note: "I'll re-use" topics used to be labeled as 'tasks' topics in earlier Jforum versions).
Attach Files: User may attach documents to your message. Click the "Attach Files" button at the bottom of the screen. File size and types of attachments are set by the system admin for the server. The software allows you to upload most standard attachments. If you are trying to attach a file and it is not accepted, contact your system administrator as its extension may need to be added.
The default upload limit is 5MB per file. You may upload up to three attachments when posting a topic. After you attach files, you must click on "Submit" to post your message with its attachments.
(Note, when you click on the Attach Files button, it appears under the Submit / Attach Files bar, but sometimes you don't realize the window expanded because it doesn't scroll down where you'll see it. You'll have to scroll down yourself. After waiting enough times, you'll eventually remember to do it yourself.)
Preview: There is no preview feature. Review your message as soon as it's posted, and if you don't like what you see, click the Edit button
Submit: This will post the new topic to the forum.
There is no reset or cancel button at this time. To cancel your operation, just click on the Back button of your browser, or the Discussion List or Discussion Home links at the top of the forum. If you don't click on Submit, your topic won't get posted.
Once you post your message, you will be taken back to the forum you were posting to and you will see your topic posted.
Back to top
Replying to Topics
'Post Reply' is appropriate when you are contributing to an existing topic (top level). You are simply adding your thoughts on an existing discussion topic rather than replying to portion of a member's reply.
- Click on the forum and then the topic you wish to reply to.
- Click the Post Reply (located at the top or bottom of the forum). Your reply will be posted at the end of the topic. The original topic is listed first, and all subsequent replies are listed below it in chronological order.
Quick Reply
You may also click on Quick Reply at the bottom of the screen to post a reply. This is very useful if you are NOT concerned about having formatting options, but you want to post a quick reply to someone and move on. The Quick Reply link gives you a small, plain window to compose and post a reply. (If you know bb code, you can use it there. If you don't know what bb code is, don't worry about it. It is not required here.)

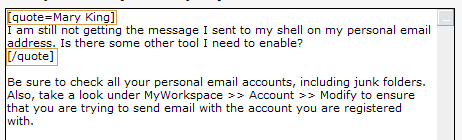
Reply with Quote
Reply with quote is a feature located in the upper right corner of the message window. It is critical to use  if you are responding to a portion of someone's message. This works very much like when you are responding to email and you are embedding comments inline someone's writing. Like in email, you should remove the parts of the message that are irrelevant to what you want to comment on, and leave just the phrase or sentence that you want to focus your reply on.
Be sure to leave the original message around the [quote=user] and [/quote], intact, as in the following example. Add your reply after the [/quote] tag.
After you post your reply, it will look like this:
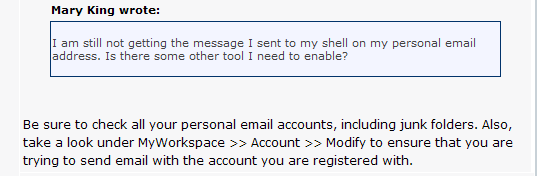
Whether you reply with quote or simply post a reply, your message will be posted at the bottom of the topic in chronological order. That is why it is critical that you use reply with quote if you want to address a specific comment so that it is framed in a border, helping others see what you are answering to.
Tip:
Avoid asking NEW questions when adding a reply to a specific topic. Add your comments to the topic by clicking on post reply or reply with quote to address another member's idea. You may raise new issues in a thread if they relate to the topic or to ask for further clarification. Questions that ask of new ideas or raise new issues will make the topic unfocused. If you want to ask a new question, somewhat related to a topic but not directly, start a new topic. You can do so in the forum's home page. You need to do your share to keep the discussion topics focused.
Back to top
Moderation Options
Admins and facilitators have the ability to manage topics: delete, move, lock, and unlock.
- You have the ability to lock topics once a discussion is over. Students will be able to view locked discussions, but they will no longer be able to post. This is a great feature to encourage time on task.
- If you determine that a topic was locked prematurely, you can unlock it again for your class.
- If students post a topic at the wrong forum, you can use move a topic and place it in the right location.
- You can delete topics that you no longer need. CAUTION: This will delete all the replies below a topic.
NOTE: If you want to delete a message/reply, you can click on the X icon of the post itself
To perform any of the moderation actions, check one or more topics and then click on the action button. The same check boxes are used for checking one or more topics to mark as having been read. See image below.
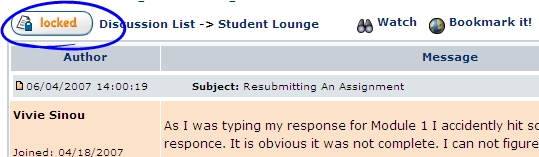
Locking a Topic
Again, you have the ability to lock topics once a discussion is over. Students will be able to view locked discussions, but they will no longer be able to post.

This is a great feature to encourage time on task. If you determine that a topic was locked prematurely, you can unlock it again for your class.
Locked topics can be easily identified by students as they have a locked icon before navigation bar at forum level. This is visible only for student roles who cannot post in locked topics/forums. However, as instructors can post/reply/edit in locked topics/forums, they don't see a locked icon. They will see the Post Topic icon/button.
Back to top
Watch Topics
If you click on "Watch" at the top of a topic, you will be notified via email when replies get posted. The email notifications will go to the email address that you are registered within the system. This is a useful feature if you want to keep an eye on a discussion that might otherwise get buried.
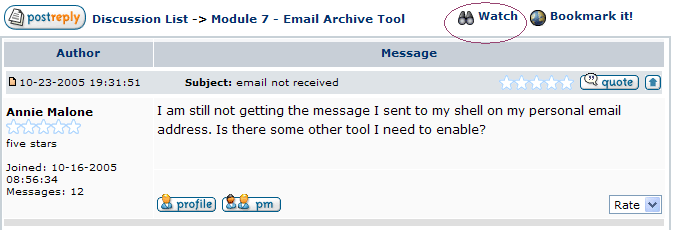
If the topic gets too much traffic, and the email notifications are getting out of hand, polluting your email in-box, you can turn it off. Simply return to that topic and click on "Unwatch" at the top of the list..
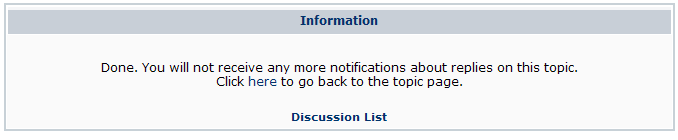
You will be given a confirmation screen with the status of your request. You will no longer receive email notification.
Back to top
Bookmark Topics
Site participants have the option to bookmark topics that may be of interest to them and wish to save or revisit regularly. To bookmark a topic, click on a forum where the topic is located, and then on the actual topic. Click on the link name "Bookmark It!" located at the top right corner of the thread.
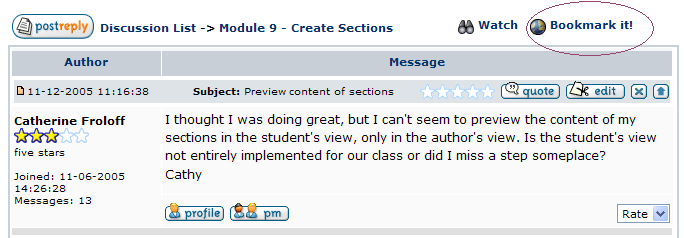
To view your bookmarks, click on My Bookmark at the menu bar. Bookmarks are site aware; you can only see the bookmarks you have saved by course. In the example below, the user has saved three bookmarks. Participants and facilitators have the ability to save bookmarks under My Bookmark.
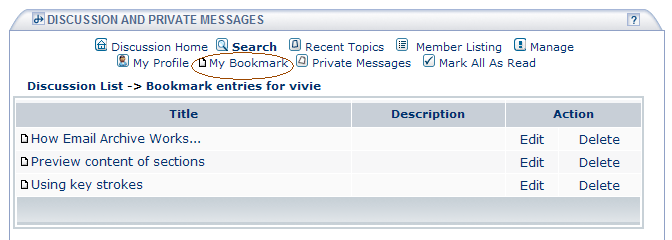
Note that you can delete the bookmarks or edit their title and descriptions (Action links located on the right of the bookmarks).
Back to top
Category & Forum Management
Category Management
To manage the categories of your discussion tool, click on Manage and then on Categories. You can...
- Insert New Categories
- Edit the properties of a category (title and description)
- Sort the order of the categories.
- Delete a category if NO forums are in it. (You need to delete forums first if you want to delete a category)
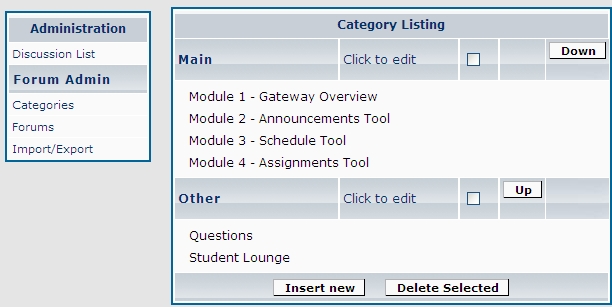
Note: You cannot edit forums from the Categories Management screen. Forums are listed for your convenience; however, so that you can see quickly what forums you have included under each of your categories. Depending on the themes covered in your course, you may not need many categories.
If you try to delete a category that still has forums in it, you will be warned that you can't:

Forum Management
To manage the forums of your discussion tool, click on Manage and then on Forums. You can...
- Insert New Forums
- Edit the properties of a forum (title, description, forum type, open/lock dates, and access rights)
- Sort the order of the forums.
- Move a forum from one category to another (use Edit)
- Delete a forum (it must be empty to be deleted. You will be prompted about that).
Here is an example of several custom forums under a "Main" category and a couple under "Other."
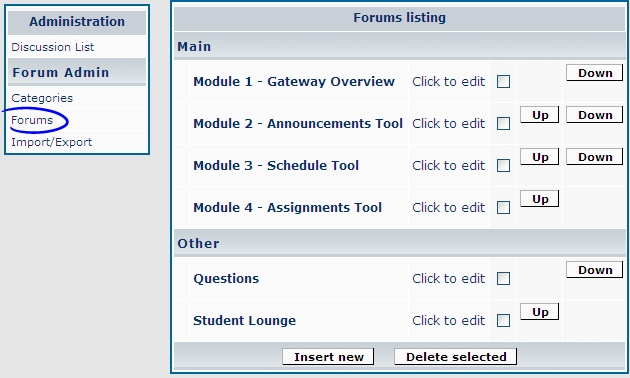
To see your newly created or revised forums, click on Discussion List to return to the student view of the software.
Back to top
Forum Types & Access Rights
he Discussion & PM tool supports three forum types: Normal, Reply only, and Read only (equivalent to locked).
When adding OR editing a forum, instructors can specify a forum type:
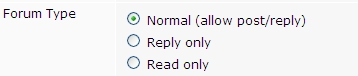
- Normal (default) - all site participants can post and reply in normal forums.
- Reply-Only - members of this forum type can only reply to posts. They cannot post new topics. This is ideal in forums where lead facilitators initiate formal discussion prompts.
- Read-Only (locked) - members of this forum type can read but not post topics and messages. This is ideal when a discussion has ended and the instructor wishes to lock further postings. Additionally, this forum type may be used for setting up a forum where instructors and Teaching Assistants post information and resources for students for viewing / reading only.
Additionally, instructors may set access privileges for forums:
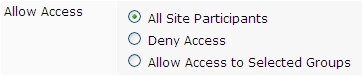
The default access setting for new forums is "All Site Participants," meaning that all registered students and guests will have access to forums with this permission.
If instructors set a forum to "Deny Access," it will not be visible to students. This feature allows instructors to hide forums from the students' view / list while they are still preparing them. Additionally, it allows instructors to archive forums and/or hide them from the students' view for one reason or another.
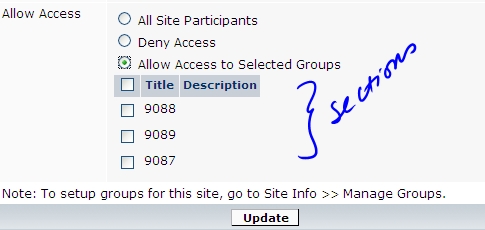
Allow Access to Selected Groups enables instructors to assign one or more sections (rosters) or one or more groups of students to a forum.
Users can recognize the different forum types in the Discussion Home by their unique icons. The following legend is included at the bottom of JForum's Discussion Home page:

Business rules
- TheQuick reply, post reply, and quote with reply buttons are not be available in locked (read-only) forums for students. Instructors, however, have the ability to post/reply in locked forums.
- Instructors can edit locked forums and topics, they can post topics in reply-only forums, etc. Instructors and administrators are all powerful, so-to-speak, and can moderate forums openly.
- Read-Only and "Lock at specific date" forums overlap. If a forum is set to Read Only (locked) upon creation, no lock at date is shown, as the action (locked) takes place instantly.
- "Make visible at x date" forums (Locked) are not visible to students until the open date is reached, but they are visible to instructors. They are marked with a red 'Deny Access' icon.
- Topics from "Deny Access" OR "invisible" forums are not be listed in gradebook.
Back to top
Forum Start/Stop Dates
You have a lot of flexibility in how you use this feature. Be sure you understand it.
- By default, if you don’t add any dates, forums are open upon creation and remain open. If you are not interested in having start and stop dates for your forums, just leave the new fields empty.
Under Manage >> Forums, you may add a 'soft' due date for forums. The forum topics will not be locked when it is reached. Students will continue to be able to post and edit their topics after the due date is reached, unless you check the "Lock Forum on Due Date" box.
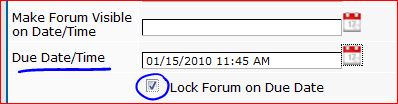
However, if the "Lock Forum on Due Date" box is checked, when the due date is reached, the forum and all the topics under it will be locked to further posting and editing by students.
The due date is used by the gradebook for sorting gradable discussion topics, forums, or categories by 'due date'. If no due date is included in discussions, they will be listed at the bottom of the gradebook, in alphabetical order.
- You may want to make your forums visible (open) on a specific date/time, but never lock them. To achieve this, simply UN-Check the “Lock Forum on Due Date” box, if it was checked before.
- You can also leave the “Make Forum Visible on Date/Time” field blank, but fill in the Due Date field and check the "Locke Forum on Due Date" box. This means that your forum will be open to your site participants upon creation, but it will be locked at the specified Due Date and time.
- When a forum has a due date/time, the due date/time is viewable to site participants from the Discussion List page, once the forum is visible (open).
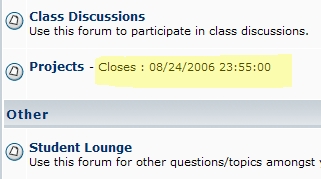
- When a forum has reached its “due forum on Date/Time," if it was set to be locked at the due date, then, a lock is shown on the icon next to the locked forum name.
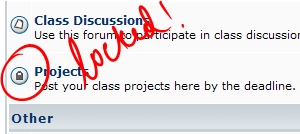
- Once a forum is locked, site participants (students or Teaching Assistants) can no longer edit nor post in that forum. Instructors can edit, reply, or delete topics in locked forums or topics.
- Topics in locked forums can be searched, bookmarked, etc.
- The buttons in posts in locked forums are still accessible, except the 'Edit" buttons. In other words, you can PM a user of a post while you are previewing their comments after a forum was locked and contact them for more information. You can use the email, IM, etc.
In summary, a locked forum ends a discussion. Site participants can no longer post or edit their topics; they cannot post replies, post quick replies, or post quote with reply. Instructors can unlock a forum.
Note: When you import locked forums, they will be unlocked in the new site.
Back to top
Uses of Groups
Group forums for collaboration
- You can break your course into groups for projects or focused discussion on topics.
- First, establish your groups under Site Info >> Manage Groups.
- Create a forum per group/project (under Disc & PM >> Manage >> Forums).
- (Optional) List the group/student names in the "Description" field of each forum to help students 'see' where they belong, or choose an A - P, R - S, etc. model for breaking students into groups.
- Once the group projects or private group discussions are over, you can 'edit' the forums and make them "Read Only" (locked) AND set their access to "All Site Participants." This way, students can VIEW but not alter the posts, yet learn from other teams. Or, you may edit the forums and make them "normal," opening them up to the whole class for further discussion, comments, or review.
Keeping forums organized by section
Suppose an ENGLISH instructor has two sections, 2908 and 2300, merged into one course site. The rosters for both sections are loaded into the site by Admissions & Records. However, the instructor may want to keep discussion private for each section, or the dialogue manageable. To achieve that, you may assign forums to specific sections. Sections are the same as groups with more metadata (from A&R).
When creating forums, if you have more than one section loaded into your site, you will see the section numbers/id's under "Allow Access to Selected Groups." This way, you can specify that a forum be ACCESSIBLE to a specific section only. See examples in the following screen shot.
Organizing your forums for different sections
If you teach more than one section in a course site, and the enrollment is large, to keep the dialogue manageable and separate, create one category (and forums) per section.
- Category 1 title: Section 2908
- Class Discussions (set access to 2908)
- Journal Sharing (set access to 2908)
- Category 2 title: Section 2300
- Class Discussions (set access to 2300)
- Journal Sharing (set access to 2300)
- Category 3 title: Main
- Questions (set access to all site participants)
- Student Lounge (set access to all site participants)
Notice that the last category is set to allow access to 'all site participants'. The instructor wants students from ALL sections to post general questions in one forum so that she doesn't have to answer them again and again for each section. A common Student Lounge is also set up.
Setting up forums for specific roles
You can create groups and forums to keep communication private, but easily accessible, amongst a specific group of users in your site (it could be a mix of instructors, TA's, students).
For example, you could create a group called "Instructional Team" in which you add all the TA's. Instructors need not be added. They have access to all. Then, you can create a forum that is accessible just to the Instructional Team to share privately how to handle things in the class.
Back to top
Import and Export
If you've set up categories and forums in your site, and you want to use the same categories and forums in your next term's site, you can export them from the existing site and import them into the new site. In addition to your categories and forums, any topics marked as 'I'll re-use' will be exported, too. IMS Import / Export is done in the Manage area.
Step 1: Make sure that all the topics that you would like to export to a new site are tagged as "I'll re-use" topics. If all your topics that you use every term are already tagged as "I'll re-use," you can continue with step 2 below.
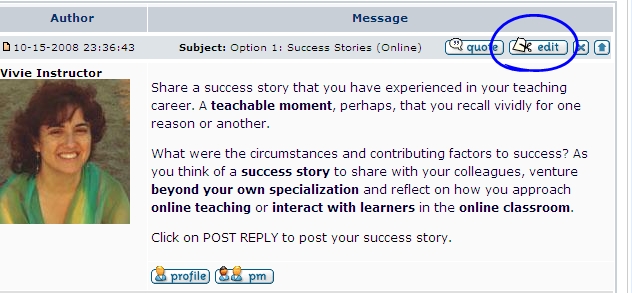
To change a 'normal' topic to a reusable topic so that it gets transferred with your forums upon export/import to another site, click on its edit button -  - and then scroll down, check the "I'll re-use" box, and Submit.
Note: If you forget to make a topic reusable and it doesn't get exported/imported into your new site, don't despair. You can return to your original site, edit the topic, check "I'll re-use," and export and import again into your new site. The process will not import duplicate entries of what you had already handled. It will only import new Task topics.
Step 2: In your old site, click on the Manage link in the Discussions tool. You'll see the small menu of options.
Step 3: Click on Import/Export. That will open the small window you see below.
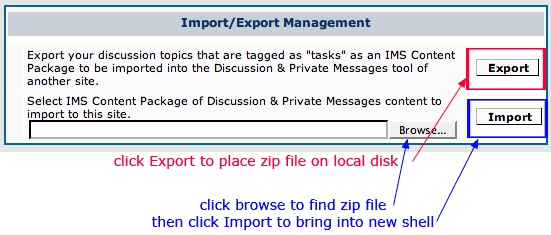
Step 4: Click the Export button. All the categories, forums and task posts will be collected into a ZIP folder. Again, only reusable topics will be exported. Normal, announce and sticky posts will not be exported. Save the ZIP folder to your desktop (or elsewhere, if you wish). Do not open the folder.You just need to know where it is downloaded for the next step. (You may want to keep the file as a local backup of your discussion forums and resuable topics).
Step 5: In the new site, go to Discussions >> Manage >> Import / Export.
Step 6: Click on the Browse button to find the folder you exported in the export process, and click on it. Then click on the Import button.
Upon successful importation, you will get a message:
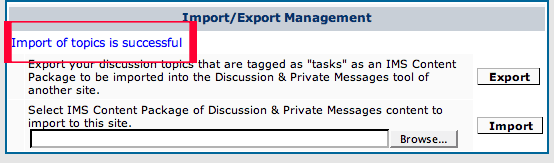
When you return to the Discussion List, you will now have all categories, forums and reusable topics in place for the new term. No replies from the previous term are imported. The topics are now ready for new students.
Some things to know about Import/Export:
- In the new site, if you had already created some categories, forums or reusable topics with the same name as in the old site, they will not be duplicated again.
- If dates to open forums had been set in the previous site, they will no longer be applicable.
- Attachments to reusable topics will be imported also. (Please note that image file attachments with a .GIF (capitalized gif) extension will not be imported. Just make sure your file extensions are lower case).
- If you've created a topic posting that was normal, but then in the process of preparing for the next term you realize that you want it to import, remember that you can edit the topic and check "I'll re-use," thus making it an 'importable' topic. You can repeat the export/import process to transfer it.
Back to top
Jforum: Grading of Discussions
Grading Options - Overview
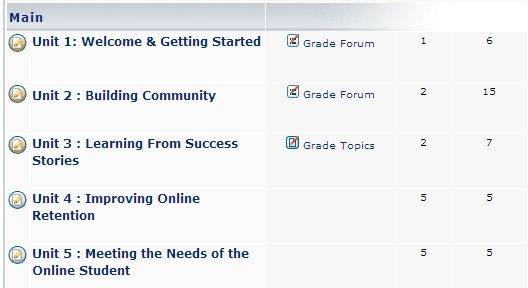
Three grading options are now available in Jforum - Discussion & PM.
Grade by Forum
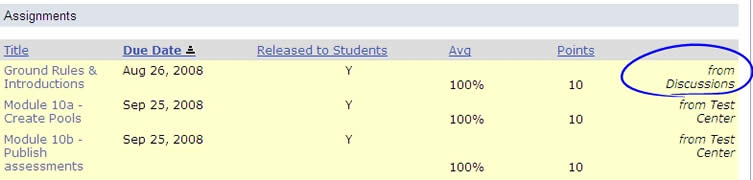
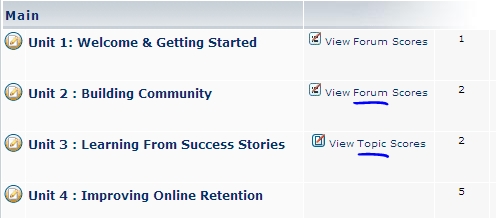
This option is ideal for instructors who would like to assign one score and one set of comments for all of a student's contributions (topics and replies) under one forum. This option gives instructors access to a single grading screen per student for the forum grade and evaluative comments. The title of the forum (one item) becomes the gradebook (GB) entry, if scores are sent to the GB.
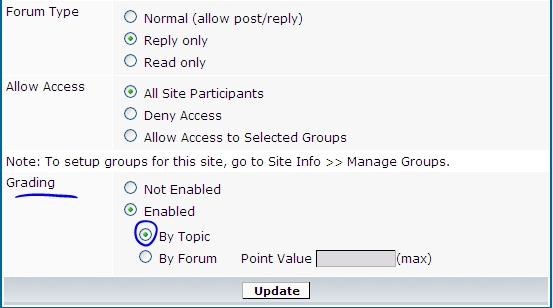
- To enable grade by forum, go to Manage >> Forums >> Click to Edit and choose "By Forum" under Grading (bottom of edit forum page). Add points. Click on Update.

Grade by Topic
This option allows instructors to assign a score to each topic, making it a unique GB entry. The title of the topic will be the GB entry, if the topic is sent to the GB. This option is ideal for instructors who assign and grade a weekly discussion topic.
To enable grade by Topic, follow this two-step process:
Grade by Category
The grade-by-forum and grade-by-topic functionality in the Discussions & PM tool meets the majority of instructors' grading of discussions needs. However, there are two other use cases that are best addressed with the new grade-by-category functionality.
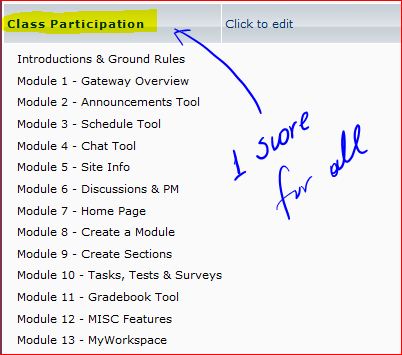
USE CASE #1: You want to give one grade for "class participation" for the whole term.
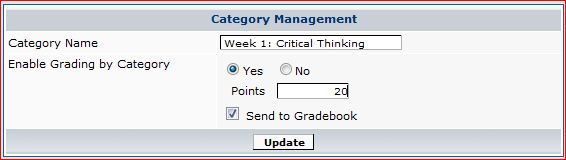
To enable grading for a category, click on Manage >> Categories >> Click to Edit.
Set the title for your category, choose 'yes' to enable grading, add your points and check 'send to gradebook.
Click on update to accept your changes.
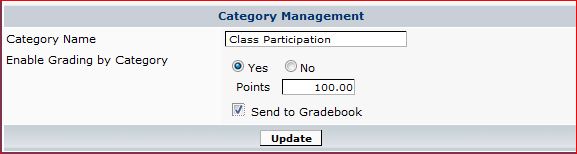
Again, this setup is for when you want to give one score to students for all of their contributions (topics and replies) ACROSS all the forums under the category. In this example, there will be just one entry in the gradebook, titled: "Class Participation"
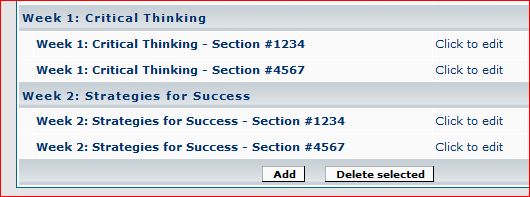
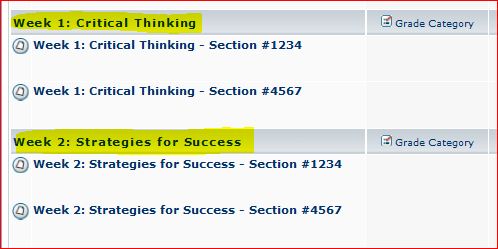
USE CASE #2: You split students into groups (or if you combine more than one section in one site), you want to send just one item to the gradebook, instead of having every group forum listed there.
Below is an example as to how you would set up grade-by-category to handle grading private groups or sections.
First, enable grading for a category. Click on Manage >> Categories >> Click to Edit.
You may also set the scores to go to the gradebook from the "Grade Category" link located in the main Discussion List.
Click on Update to save your changes.
Then, under Manage >> Forums, set up forums for each group or section, and place them under gradable categories, as in the example below.
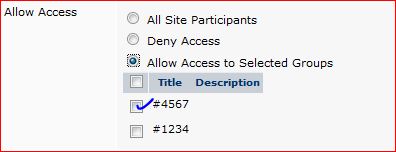
To make your forums private (by section or group), go to Manage >> Forums >> Edit, and set group access to each forum. Check "Allow Access to Selected Groups" to choose the right group / section.
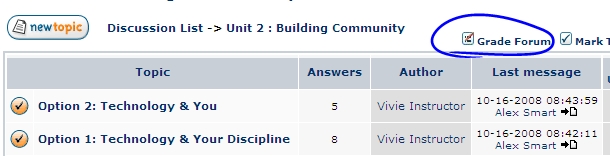
You can grade your students' contributions in context, by clicking on 'grade' on each student's post, adding more points to the previous score every time you evaluate additional contributions.
Additionally, you can click on "Grade Category" from the main Discussion List. From there, you can see the total count and view ALL of a student's posts across the forums of that category - all in one page.
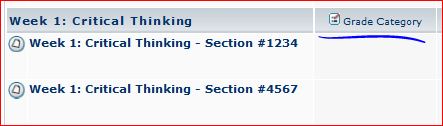
The title of the category is what will be sent to the gradebook. Each student will see the title of the category there. In our example, they would see the highlighted category titles below will be sent to the gradebook. Not the forum titles.
Comments Only - Zero Point Value Forums / Topics
If you do not assign scores to students for discussions, you may consider enabling grading of forums or topics to be able to give students private feedback about their forum / topic contributions.
By enabling grading, you will have access to statistics on the number of posts per student, by topic or forum (depending on your choice). And, you will be able to view a student's collective posts in one page.
- To enable grading, without assigning scores to students, set the point value of the forum or topic to zero (0).
- A zero point value means that the topic or forum will not be counted toward the grade, and will not be sent to the gradebook. Students will see your comments, but they will not see a zero (or other) point value.
If you change your mind and you want to assign points for a forum or topic, revise the forum or topic and change to zero to points.
Back to top
Accessing Grading (Instructor View)
If you have enabled grading in your forums (by topic or by forum), you can get to the grading views quickly from Discussion Home. You may have both grade-by-forum or grade-by-topic options enabled, as well as have forums that will not be graded, all in one discussion board.
You can also get to the grading view for a forum from its home page:
Instructors can access the grading views when clicking on Recent Topics, as well.
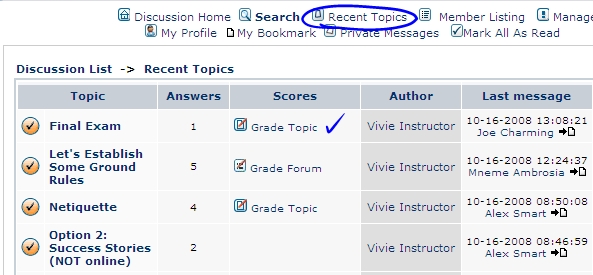
Working with Recent Topics is a great way to keep up with evaluating new student contributions as they come in.
"Mark All As Read" or "Mark Topic As Read" can be used strategically to also signify completion of grading (until we have "Mark as Evaluated" in Jforum).
Back to top
Viewing Scores (Student View)
If instructors have enabled grading in their forums (by topic or by forum), students will have equivalent options in their view. However, instead of the term 'grades', they will see 'scores' in their view.
Students can also access their scores when clicking on Recent Topics.
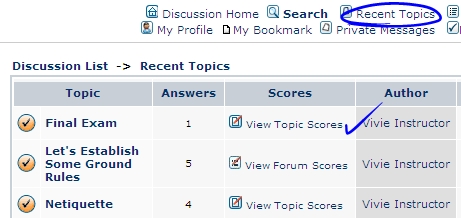
Students click on "View Forum Scores" or "View Topic Scores" to review their instructor's evaluation.
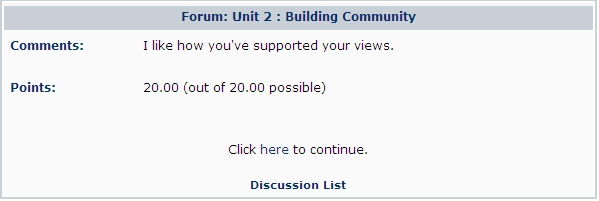
If their posts are not yet evaluated, students will see the following:

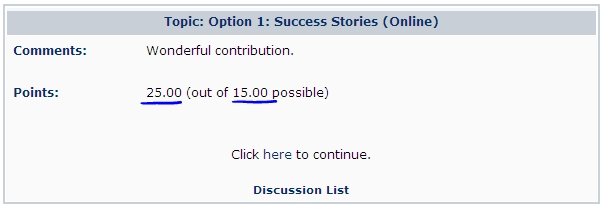
Instructors can go over the maximum point value of a forum or topic and award extra points to students, as appropriate. Below is a screen shot, showing what students will see in their view.
Back to top
Grading Home Page
This option allows the instructor to view all the contributions of a student and see their total number of posts for a topic or forum.
By default, the grading list shows students in alphabetical order. In the following example, the grading view is sorted by "Answers" (posts), which brings up contributors at the top of the list.
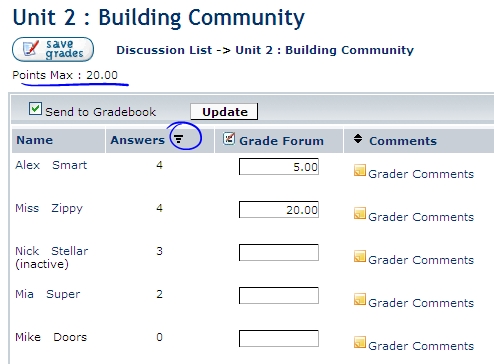
To add or revise comments for a student in this view, simply click on "Grader Comments."
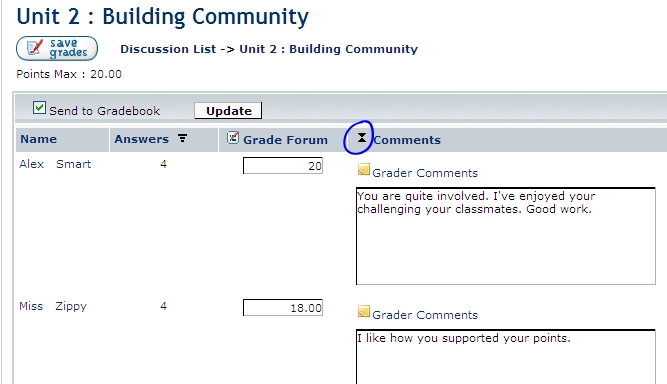
To expand all the comments fields on this page, click on the expand icon. See below.
From this view, you can choose to send the scores to the gradebook (GB). An entry will be created in the GB based on the title of the forum or topic.
Note: Unchecking the "Send to Gradebook" checkbox and clicking on "Update" or "Save Grades" (same function) will REMOVE the item and scores from the gradebook. You can re-check and resend to the GB at any time.
Viewing All of A Student's Contributions
From the grading view, clicking on a student's name, allows the grader to see all his contributions (out of context) for the forum (or topic, if grade-by-topic is enabled).
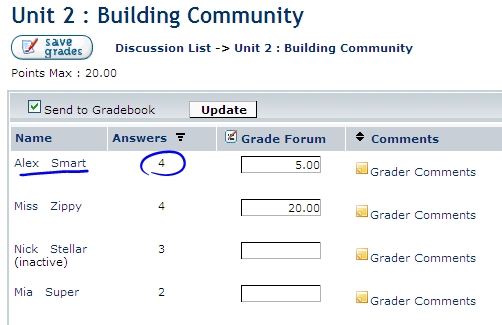
When clicking on Alex Smart's name (in our example), we will see all four (4) of his posts to the "Unit 2" forum.
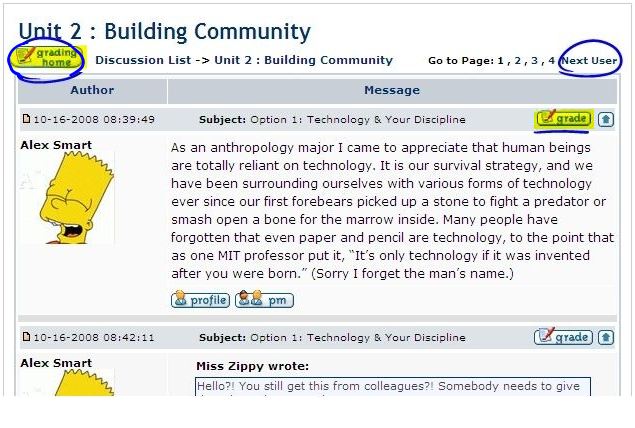
Clicking on "Next User" allows the instructor to evaluate those who have contributed and see each individual's work - all contributions of a student in one page.
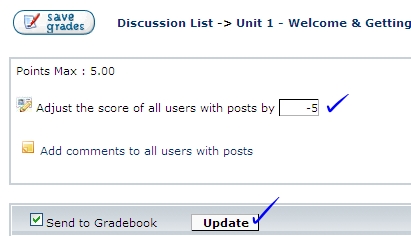
Adjusting All Scores
Ability to 'adjust the score of all users with posts by _'.
This feature allows instructors to adjust the scores of all students who have posted in a topic or forum. Also, if students have not posted topics or replies but were awarded points by instructors, they will also receive the global score adjustment. Negative point values are allowed.
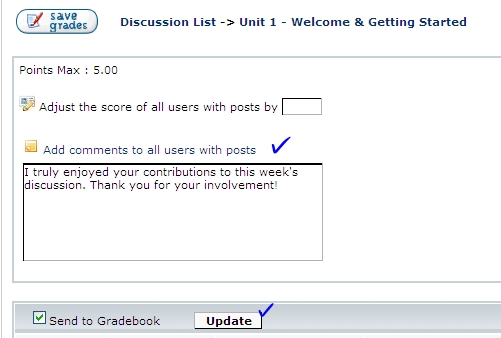
Add Comments to All
Ability to "add comments to all users with posts." This feature allows instructors to append comments to all students who have posted in a topic or forum. Also, if students have not posted topics or replies but were awarded points by instructors, they will also receive the global comments.
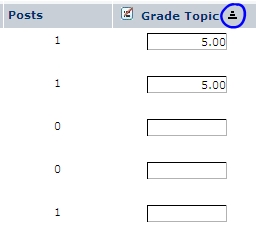
Sort Grade Topic Column Header
You can sort the grade topic column header to bring up graded or blank entries. This helps instructors sort by ungraded or graded participants. The 'name' and 'posts' columns are also sortable, assisting instructors further to find who has or has not contributed.
Back to top
Grading Business Rules
Some business rules related to grading include:
- You cannot delete nor move a topic that has grades.
- You cannot change a forum to non-gradable once it has grades.
- You can delete replies - should be done only in rare cases (offensive posts)
- You can change the point value of a forum or topic, even if you have started grading. Just click on 'send to gradebook' to update it.
- You can rename titles of forums and topics. Upon clicking on 'send to gradebook,' the titles will be updated in the gradebook entries.
The role of the gradebook:
- The use of the gradebook with Discussion & Private Messaging is optional. The grading functionality of JForum does not require the gradebook in order to work. You may enable the gradebook from the onset, you may leave it out of your sites, or you may enable it later in the term and send the scores over at that time.
- Students will see your comments and / or scores in Discussions & PM. If you have chosen to send scores to the GB, they will also see their scores there.